Where to Buy Shipping Boxes

This informative article tells readers where to purchase shipping boxes, highlights the disadvantages of buying them at a store and lists the benefits of purchasing boxes online. Read more to learn which website offers shoppers an exceptional shopping experience.

Disadvantage of Buying Shipping Boxes at Brick and Mortar Stores

Although office supply stores and post offices often sell shipping boxes, they may not be the most convenient places to buy them. Even flat boxes can seem unwieldy and Continue reading

How to Make a Tulle Bow

The mesh fabric of tulle is the perfect material for creating beautiful decorative pieces. Whether your goal is to wrap a gift, embellish a party favor or even decorate a basket, tulle can easily be used to do so. A simple and classy way to enhance any of these things is by creating tulle bows. In order to do so, you can choose a roll of tulle of any color that is between 5 to 6 inches wide. If the width of the tulle is any larger, maintaining the shape of the bow becomes more difficult.

Once you have chosen your tulle, cut exactly one 4-inch piece and two 6-inch, 8-inch, 9-inch, and 10-inch pieces of tulle. Next, fold each section of tulle in half and glue the ends together using hot-glue. The 10-inch pieces will serve as the outer most layer of your bow while the 4-inch piece will be used as the center of the bow.

Take the two folded 10-inch pieces and lay them on a flat surface and glue the ends of the pieces together so that both pieces are connected to appear as one layer. Continue with the remaining folded pieces of the equivalent lengths and layer them on top of each other from the longest on the bottom to shortest on top. Make sure to glue all the ends of the pieces together to create each layer and glue each layer to the previous one.

Complete the bow by gluing the 4-inch piece in the center. To add the tails of your bow, cut the remaining tulle on the spool into equal lengths. Glue the tails onto the back side of the bow you have created. For a little flare, you can cut the ends of the bow’s tails into a “v-shape.” After creating this simple bow, you can easily take a plain hook and attach it to the back of your bow to decorate any item as you desire.

Christmas Tulle Ideas

With the holiday season right around the corner, it’s time to break out the gift-wrapping paper for what seems like the two hundred gifts you will be giving away to friends and family. Perhaps you are even a little bit like me: year after year I buy what I consider enough gift-wrapping paper to last me at least a couple of years (so I won’t have to get anymore), and yet every holiday season it has mysteriously disappeared and I have to go buy more. Does that sound familiar?

This year I realized I was kind of tired of the same ‘ole same ‘ole, so I decided I wanted to try something different, but as much as I thought about it, nothing came to mind. Finally, it came to me: tulle! Check some of these gift-wraps out:

It can range anywhere from the classy and sleek

To the simple

The best thing about tulle is that it allows for greater creativity than just ordinary gift-wrapping paper. For example, you can wrap every square inch of a gift in the classic way, or you can cut a smaller thread to use as a bow like this:

Another clever alternative is to use tulle for small candy or cookie bags. It gives it just that extra touch of creativity and flash:

Tulle is a fantastic material to use for gift-wrapping because it is very flexible (so you don’t have to worry so much about tearing) and can be suited to wrap gifts of any size. It also shows the person receiving the gift that you added that little extra holiday touch. Happy holidays!

Holiday Tulle

Now that Thanksgiving is done and we’ve all gained ten pounds, many of us have now turned our thoughts to Christmas decorations. Of course, the centerpiece of any Christmas decoration is the Christmas tree. Maybe you’re like a lot of other people out there: you want to spruce up your tree while at the same time trying something different this year. If so, then keep reading. I am about to show you three clever ways to use tulle (that’s right, tulle!) for decorating your tree and adding a little swag to your Christmas.

  1. Tulle-Stuffed Spheres: tired of all the usual Christmas spheres on your tree? Then go out and get some glass spheres that you can stuff with tulle. Here’s how you can transform your Christmas tree (see image below). The best part is that you don’t have to spend a lot of time deciding which spheres to pick out. You simply buy tulle in any color(s) you want, stuff the glass spheres, and hang.
  1. Tulle up your Christmas Tree Skirt: toss the usual red skirt that you put at the bottom of your Christmas tree, on which you put your presents, and use a Tulle skirt instead. It adds a vibrant color to your tree and is sure to be an eye-catcher!
  2. The 100% Tulle Christmas Tree: Last but not least is the 100% tulle Christmas tree! Here’s an example of what that looks like:

The great thing about this idea is that you can use it as a substitute for your living room Christmas tree, or you can also make small, decorative tulle-trees that would go great as a centerpiece on any living room table.

Any of these options are bound to add that little extra spice to your decorations this year, and are sure to capture a lot of eyes and compliments. Happy holidays!

How to Make Simple Tulle Hair Ties

There are countless hair accessories that you can make with tulle.  From pompom hairbands to fluffy hair clips, the possibilities are quite endless when you take into account the huge selection of colors and patterns available with tulle. One of the simplest ways you can flair up a ponytail or pigtails is with a tulle hair tie. Making one only takes a few minutes, so you can easily create a bunch at one time. These are great for little girls to wear with holiday dresses or even as an everyday hair accessory. You should be able to find a tulle color or pattern that matches every dress in the wardrobe quite easily. All you need is a few inexpensive supplies and you are all set to begin.

 Here is a quick photo tutorial on how to make a simple tulle hair tie. Even your kids can help out with this project!

Supplies

6″ roll of tulle

Hair Ties

Scissors

Measuring tape

Image 

Instructions

1. Cut six tulle strips that are each 8 inches long. If you want a fuller tulle puff, you can cut more strips.

Image

2. Take one strip and fold it in half.

3. Place the looped side of the tulle strip into the center of the hair tie.

Image

4. Take the ends of the tulle and run it through the loop.

Image

5. Pull it all the way through and tighten.

Image

6. Repeat the process until you have used all your tulle strips.

Image

7. Use the hair tie as you normally would.

Dress Up your Party Table with Tulle

Want to jazz up a plain tablecloth for a party? It’s simple! Just add some tulle! Tulle table skirts are great décor for birthday parties. What little girl wouldn’t want to have a party table dressed in a pink tutu ? If her party has a character theme like Disney Princesses, you can use tulle colors that match the Princess’ dress. For example, shades of blue for Cinderella, yellow for Bella, and green for Ariel. Tulle table skirts are not just for little girls though. They can be used for big girl events too like weddings, bridal showers, and holiday-themed parties.

There are several ways you can attach the tulle to the tablecloth. The easiest is by gathering and pinning the tulle to the tablecloth. The folks at CatchMyParty.com have a wonderful step-by-step tutorial on how to make a no-sew tulle table skirt. You will need a lot of tulle for this project – at least10 yards worth. Fortunately, Papermart.com has tulle bolts available in a variety of colors at a great price. You can also cover up the pins with a glitter or jewel ribbon, once the tulle has been attached to the tablecloth.

We have scoured the Internet looking for some of the best DIY tulle table skirts. Creativity is definitely in full bloom when it comes to these gorgeous table skirts. We hope one of these will inspire you to make your own tulle table skirt for your next party or event!

babyshowertable

Baby Shower cake table with a full tutu skirt.

elmotulle

Birthday Party – Elmo themed table.

littlegirlstable

Tulle table skirts are not just for parties. You can incorporate them into your home. This mom made one for a table in her little girl’s room.

longtable

Great for decorating long dessert/cake tables for any occasion.

Rainbow_tulle

Lights! Hang Christmas lights onto the table first, then attach the tulle. This is perfect for outdoor parties.

weddingtulletabe

A beautiful wedding table with tulle skirt.

weddintututable

Another wedding table with gorgeous pink tulle.

How to Make a Tulle Pom Pom

An easy way to decorate for parties and weddings is with tulle pompoms. They are pretty simple to make and can be made in all different sizes. You can use it as décor for baby showers, birthday celebrations, or even just to decorate a little girl’s room. Tulle pompoms are also great for headbands, fairy wands, and can be used to top a present in place of a gift bow. Here is a great video tutorial on how to make a tulle pompom.

 Instructions

1. Take a piece of cardboard or poster board and draw a circle with a diameter of 8 inches. Cut out the circle.

2. Then draw a smaller circle within the cut-out circle. The diameter of the smaller circle should be around 2 inches.

3. Cut out the inner circle as well, so that it looks like a donut. This will serve as your template for the pompoms.

4. Fold the template in half and cut slits in the middle.

5 Take the end of the 6″ roll of tulle and cut a piece about 3 yards long.

6. Tuck this piece into the slits. This will be the tail of your pompom.

7. Place your tulle roll in a box to contain it while you wrap.

8. Wrap the tulle around the template 16 times.

9. Repeat the process 2 more times, so that you have wrapped the tulle around the template a total of 48 times.

10. Cut the tulle off.

11. Take the ends of the tail from step 6 and tie a double knot.

12. Using sharp scissors, cut the tulle along the top of the template.

13. Tighten your double knot even more and take the tulle pompom off the template.

History of Tulle

The history of tulle goes back to the 1700s in the south central French city of Tulle. The city was a center point for lace and silk production, and the early manufacturing of tulle probably originated from here. Although tulle netting had made appearances before this era, it is around the 18th century that tulle was mass produced and thus affordable to more people.

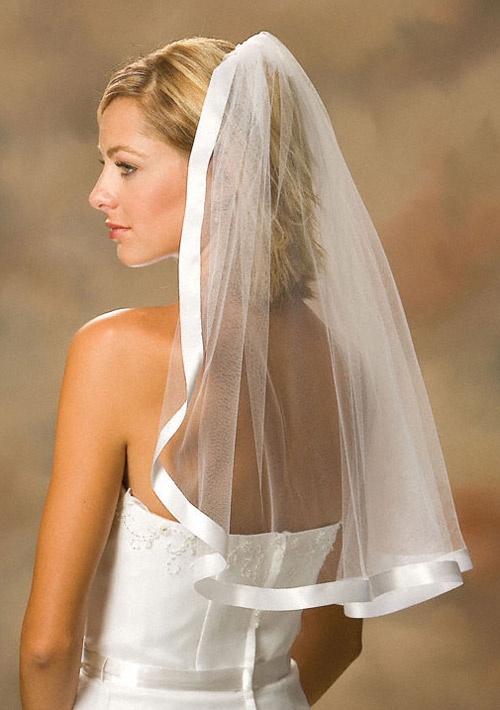
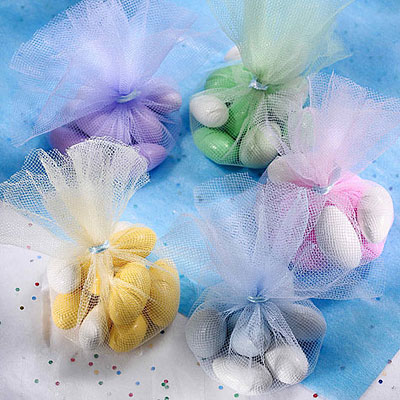
Since tulle is a lightweight, breathable mesh material that can be layered with other fabrics, it is ideal for making garments. Tulle was use to make underskirts or petticoats, that would form the bell shape of the ballroom gowns. In 1840, Queen Victoria wore a tulle veil at her wedding, which popularized the material even more. Soon after, tulle became the crowning glory for wedding attire and decorations. Even today, tulle is incorporated into wedding gowns, veils, favor bags, wedding decorations, and much more.

Image

Portrait painting of Queen Victoria with her tulle veil

In the late 19th century, fashion designer, Frederic Worth created the veiled hat, which used the netted fabric to partly cover the face. It instantly became a fashion hit among women. Tulle also enjoyed a comeback in the 1950s as material for layered prom gowns.

In addition to fashionable garments and accessories, tulle is also useful for insect control. This netted material allows for air to circulate, while keeping insects out. Tulle is often used to create insect tents over beds, which helps to protect people from mosquito bites. Similarly, tulle can be used to create a dome-shaped tent that can be placed on top of a table to cover dishes and protect food from insects.

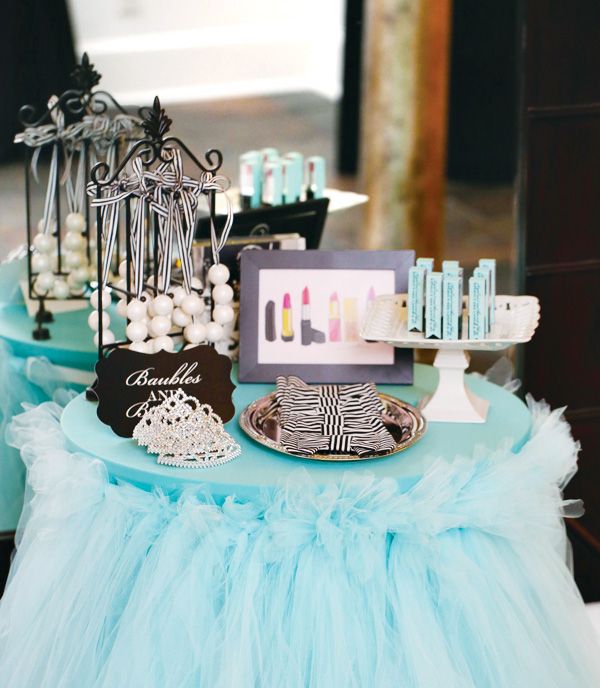
Today, tulle is more popular than ever. It is often incorporated into craft projects, garments, fashion accessories, and even shoes.


Rolls, Bolts, and Circles – Choosing the Right Tulle Size

One of the most useful materials for crafting is tulle. It’s a wonderful, inexpensive material that can be used for decorations, clothing accessories, embellishments, and much more. The great thing about tulle is that it comes in different sizes – rolls, bolts, and pre-cut circles. Depending on the project, you may choose one of these sizes or a mixture of them. Let’s take a look at some of the most common uses for each of the sizes.

Tulle Rolls

The most popular size of tulle is probably the 6″ width roll. This is ideal for small crafts project and clothing accessories like hair bows.  The 6″ rolls are also perfect for making tutus, tulle wreaths, and gift bows. You are more likely to find a larger selection of colors and patterns with tulle rolls than bolts. Glitter and shimmer tulle tend to come in this size as well.

 Image

Image


Tulle Bolts

Tulle bolts are great for decorating party venues and wedding halls. You can hang the tulle from the ceiling using hooks or tacks. Consider incorporating white lights with your tulle for an outdoor wedding or party. Tulle bolts usually come in 54″ or 108″ widths. If you are planning to make your own wedding veil or a tulle skirt, you should purchase tulle bolts since it is more cost-effective than the rolls.

Image 

Image


Tulle Circles

Tulle circles are just what their name implies – pre-cut circles of tulle. These are great for making inexpensive party or wedding favors. Simply place some candies in the center of the circle, gather up the surrounding tulle and tie a bow with silk ribbon.

Image 

Of course if you are planning a party or event, you are more likely to use a mixture of tulle rolls, bolts and circles. Don’t worry about having too much tulle leftover. Since it is such a versatile material, you are bound to find a use for it in the future.